Inserting Hyperlinks in Word Documents
Inserting Hyperlinks in Word Documents
Effective September 1, 2017, the SEC© will implement a new rule that all EDGAR© HTML filers must now include hyperlinks for all internal and external Exhibits listed in the Exhibit Index for most electronic Forms.
The instructions below will help you insert EDGAR© Archive hyperlinks in your Word documents.
Step 1
In Word, select the text where the hyperlink should appear, in this case “Form of Series A Warrant” will be hyperlinked.

Step 2
In your browser, find the link that should be inserted into the Word document, in this case we need the link for Exhibit 4.2 which is the “Form of Series A Warrant”. Select the link from the browser address bar and copy it.

Step 3
Go back to your Word document and select the “Insert” tab from the ribbon, and in the “Links” section, select the “Hyperlink” button

Step 4
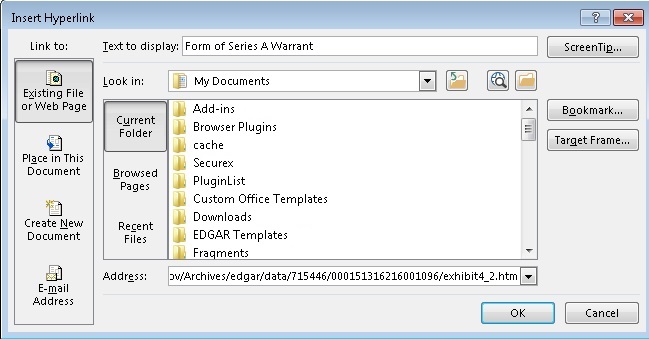
In the dialog box that pops up, ensure the following:
- The left panel has “Existing File or Web Page” selected;
- The “Text to Display” has the same text you selected in step 1.
Paste the link copied in step 2 into the “Address” field at the bottom of the dialog, ensure the following:
- The link pasted has no extra spaces before or after the link;
- The link contains “http://” at the beginning, “https://” (with the ‘s’) is also acceptable;
- The link is from the SEC© archives, links to any other source is not allowed by the EDGAR© system.
Press “OK” when finished.

Step 5
This step is often overlooked but is very important, the link should be tested to make sure it was properly inserted. To test the hyperlink you must click on the link while holding down the CTRL key. Holding CTRL is a Word requirement and this step is not needed once converted to HTML.
If errors are found, repeat the process.


